 Have you ever done a project that has taken years to complete, only to decide you wish you had done some or a lot of things differently. I have learned lot of things over the course of my Tapestry Project. Here are a few of them.
I just started this project. I did not have a clear plan on what was to go where or how large the final piece would be. I did think to measure the largest display location in our house to make sure that it would fit, when completed. Hence the limit of six panels and a border. I tracked down sizes for the panels that are held in the Victoria and Albert. Then I found a metric tape measure and drew a box. If I had done a little more planning I would not have run into problems with the designs I wanted to put on the panels and the colors of the clothing that I wanted to put people in.
I learned the technique second hand from my Mother who went to a class at Pennsic. She had a poorly Xeroxed single sheet of paper with a name and a tiny, tiny bit of documentation. My Mother thought that this was wonderful and that I should learn how to do it. After a while when your Mother states that you need to learn how to do something you just say “Yes Mom, when would you like to start.” So I learned how to cut and shape the wool felted people and outline them with black cording. It was fun and I kept going. It took me a lot of time, before I tried to find more information about the Tapestry. Perhaps too long.
I tried to contact the lady who offered the original class at Pennsic. No luck, she did not respond to email. I think she is from the East Kingdom, but I really do not know. Time passed and an other class was offered at Pennsic. I went to the class, it was huge. The class was taught by a different teacher. The class did not offer any new information and the samples shown were nothing like the piece I was working on. They were wool appliqué for household goods mostly pillows.
I ran into a dead end using the term Story Cloth as a research field. That is mostly a term used in Africa textiles and Kindergarten felt boards. If you are going to teach a class, please learn the correct term for your craft. If you do not know the correct term for the textile technique you are doing, let people know. Do not make something up. Had I know the term Intarsia I think I would have found a little more information a lot quicker.
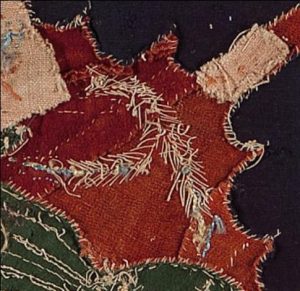
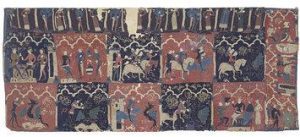 Time passed and I continued to research the project. Always research first and create second, never the opposite way around. I know this and I knew it at the time I started the project. I found the Tristan Tapestry piece in the V&A. There were a few pictures, but not many. I found one book with two pages of information, plus a picture of the back of the textile. And that was it. Nothing more to be found. Again time passed and more panels were added. I was talking to a friend who said I just saw a book on that. I was amazed, as I had never found any.
Time passed very slowly and my copy to the book arrived. It is a glorious book. It has colored pictures. It was dual language, so I did not need to learn Swedish. It had several different pieces from across the Norse area. But wait I thought the Tapestry style was English, after all the only fragment I had seen was in an English museum. And for the record the Victoria and Albert piece is not in the only book. Arggh, I am interested in Anglo-Saxon work, even if this piece is 400 years past my favorite eras.
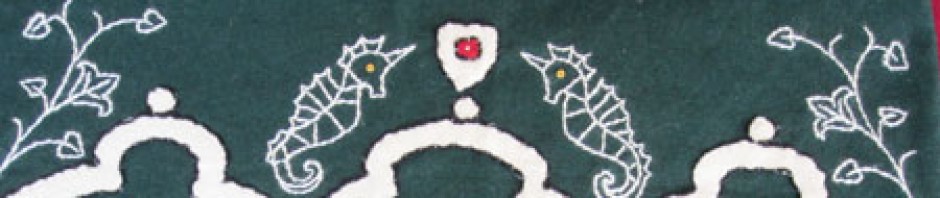
I continued to read and reread my book on Intarsia. I focused on the earlier pieces and the pieces that are similar in style to the piece that had inspired my Tapestry. That is when I realized that the black cording that outlines all of the people and different shapes on my Tapestry was incorrect. It was not black silk cording rather it was old dried up gilded leather. I could stretch the truth and accurately state that silk was used in the embroidery. It was, but only very rarely. I have found a single example in the medieval time period and a few Victorian examples. I can see how the mistake was made by the original person, because when you look at the piece the dried up old gilded leather does look like a dark outline. But a simple look at the materials list with a better understanding of what I was looking at could have prevented this problem.
 I was at a cross roads. Did I stop working on my tapestry? Did I rip out a lot of black cording? Did I start over? Or should I just continue onward. I chose to continue onward with the style I already had put so much work into.
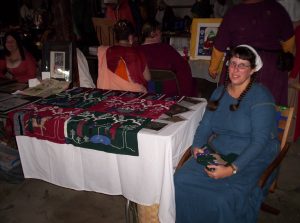
I took my Tapestry to the Old Barn for a Pennsic Arts and Sciences display. I got lots of nice compliments and encouragement. The best was from a couple of ladies who just breezed through the Barn on their way to somewhere else. They said “Hey did you see that, I saw the original in London.” I took that to mean the style of my piece was recognizable enough to continue.
I made an other Tapestry using the correct intarsia or inlaid felted wool style with real gilded leather. It just shines. It taught me a lot of other lessons.
The lessons that I learned from my second tapestry involve purchasing quality materials. I already know that you get what you pay for with art supplies, why I did not think about this when purchasing wool is beyond me. The wool has to be a tight weave. It has to be able to withstand the rigors of the washing machine. That is how it was felted. It has to stay crisp when cut with scissors and not fray or ravel on the edges when picked at with a finger nail. The wool must be 100 % wool and not be a blend of anything. Some of my early wool was a gift of unknown fiber origin. If the piece of wool will not meet these simple guidelines then I will not use it (or in this case I should not have used it.) In my defense it is hard to buy quality wool in Virginia, as our winters do not get cold enough to warrant a lot of wool clothing.
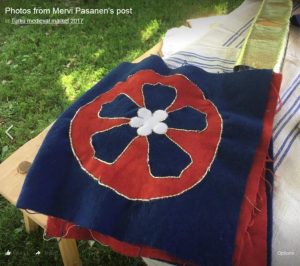 Again time passed and Intarsia pieces started to show up on my Facebook Page. I recognized the pieces from my book, but these looked new. They were even more impressive. I tracked down the artists and learned google translate. There are two ladies in The Netherlands who are recreating the tapestries to be displayed in the original churches. They dye all of their own cloth using natural dyes. They stitch using the correct thread and they are tacking down the gilded leather is similar chunky stitches to the way I had done things. Even better. They respond to Facebook messages. Unfortunately they will not come to Virginia to give me a class and so far I have been unable to visit them. I wish there was a way I could take a class by mail.
It was a pleasant surprise that I could just order gilded leather online. There is one person in Canada who has an online embroidery business. I ordered a few 6 inch squares and cut it into narrow stripes. It was not easy to sew, as it was so delicate and easy to split the layer of leather. A leather needle helped but it was still hard on my hands. I looked at the surviving gilded leather stripes in museums to get an answer on scale or size the cut the gilded leather. While my 3 millimeter strips are correct I think I would go with a smaller width. Having said that I do not know if I could have maneuvered the gilded leather stripes around all of the fine details of my people.
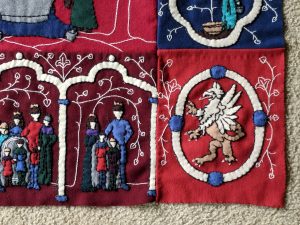 Color and color placement were carefully chosen on my tapestry. I specifically looked for two different color blues and reds that were not quite a perfect match. I am not color blind, this choice was made to look similar to the original inspiration pieces. The artists who created many of the different Intarsia pieces were not concerned with a perfect match and neither am I. I also broke up the border in locations that do not look correct to the modern eye. That is yet an other detail to tie my piece to the past by using line and color.
 The last question I had to answer before I finished my tapestry was what does the back look like? It there a linen ground to stabilize the piece? Is it wool? So a wrote the two ladies a message. I never expected the answer to my question to be “there are no backings.” The piece were not designed to be hung on a wall, they are table coverings. Arrrg. My piece is designed to be hung on a wall.
Recently a friend told me that quilts often had a backing which could be removed for cleaning. I do not have time to track down the resources for this piece of information, plus my tapestry is not a quilt. I can state that very few of the tapestries in the Intarsia book have backings or bindings. The lack of a backing has made it necessary to tack down my seams and make the back a bit tidier than it was in the past. After careful consideration I have decided to add a back to stabilize the piece and make it possible to hang on a wall. I will also bind the edges, again to make the piece last as long as possible.
I have been working on this tapestry for a long time, perhaps as much as a decade. It gets put away for long lengths of time, usually in the spring and summer because wool is too hot to work on in the south. Having said that, I have taught at 2 classes at Pennsic and a class locally on the technique. For the class we make a small pin cushion. I thought I was done teaching this class at Pennsic this year but I just learned that Tandy Leather sells gilded cording which would look amazing on the little pin cushions.
The Intarsia pin cushion class was created to put a mid-level technique in my repertory of classes that I can teach. Somehow I teach more beginning level classes regularly or I teach well enough that harder techniques seem easy. Either way I have learned a lot and teaching the class has upped my level of teaching a small step.
You will have to ask me about the stories behind each panel and who is who in the panels. This piece holds many special memories for me and I am happy with it.
At this point I have decided to just complete the Tapestry and enjoy the fact that is tells my story in the SCA. Does it have flaws. Yes. Would I do it differently? Yes. Am I going to hang it in my tent for all to enjoy? Hell Yes!